HTTP
HTTP
概念
Hyper Text Transfer Protocol :超文本传输协议
传输协议
定义了,客户端和服务器端通信时,发送数据的格式
特点
- 基于TCP/IP的高级协议
- 默认端口号80
- 基于请求/响应模型:一次请求对应一次响应
- 无状态的:每次请求之前相互独立,不能交互数据
历史版本
- 1.0:每一次请求响应都会建立新的连接
- 1.1:复用连接
请求消息数据格式
- 请求行
- 请求头
- 请求空行
- 请求体(正文)
1 | |
请求行
- 请求方式(get)
- 请求url:(/login.html)
- 请求协议/版本:(HTTP/1.1)
请求方式
HTTP协议有7种请求方式,常用的有2种
- GET
- 请求参数在请求行中,在url后
- 请求的url长度有限制的
- 不太安全
- POST
- 请求参数在请求体中
- 请求的url长度是没有限制的
- 相对安全
请求头
客户端浏览器告诉服务器一些信息
请求头名称:请求头值
常见的请求头
User-Agent
浏览器告诉服务器,我访问你使用的浏览器版本信息,可以在服务端获取该头的信息,解决浏览器的兼容性问题
Referer:http://localhost/login.html
告诉服务器,当前请求从那里来。
作用:
- 防盗链(判断referer是否等于自己网站的地址)
- 统计工作(判断referer等于那个地址,去计数)
请求空行
空行就是用于分割POST请求的请求头,和请求体的
请求体(正文)
- 封装POST请求消息的请求参数的
响应消息数据格式
- 响应行
- 响应头
- 响应空行
- 响应体
1 | |
响应行
组成
协议/版本 响应状态码 状态码描述
响应状态码
服务器告诉客户端浏览器本次请求和响应的一个状态
状态码都是3位数字。
分类:
- 1xx:服务器接收客户端消息,但没有接收完成,等待一段时间后,发送1xx多状态码
- 2xx:成功。代表:200
- 3xx:重定向。代表:302(重定向),304(访问缓存)
4xx:客户端错误。代表:404(请求路径没有对应的资源),405(请求方式没有对应的doXxx方法)5xx:服务器端错误。代表:500(服务器内部出现异常)
响应头
格式:头名称:值
常见的响应头
- Content-Type:服务器告诉客户端本次响应体数据格式以及编码格式
- Content-disposition:服务器告诉客户端以什么格式打开响应体数据。存在以下值
- in-line:默认值,在当前页面内打开
- attachment;filename=xxx:以附件形式打开响应体,文件下载
响应空行
响应体
传输的数据
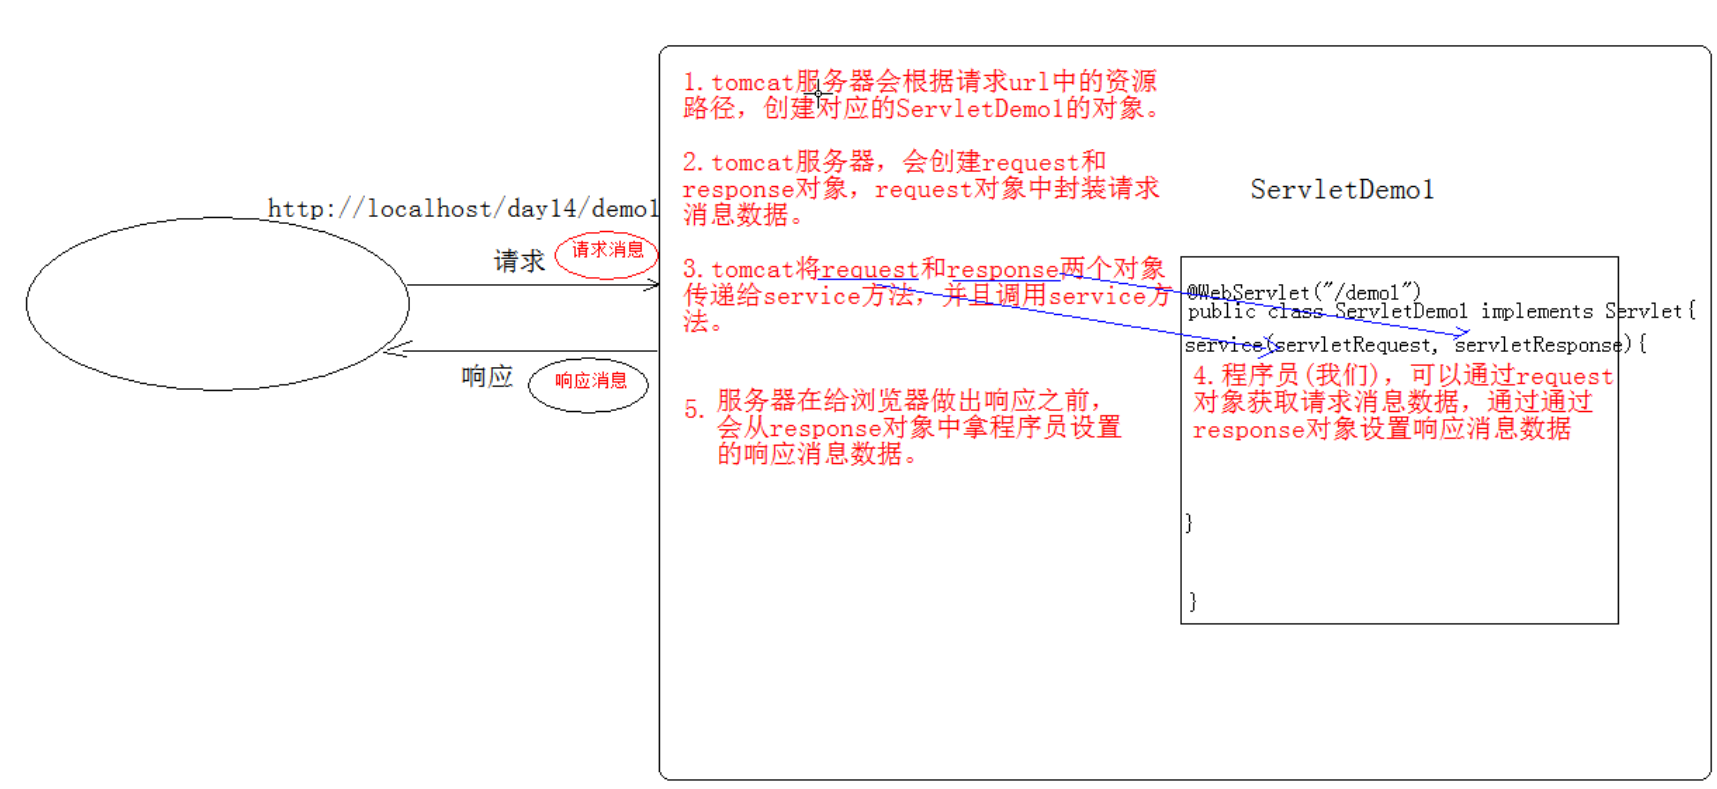
Request
- request和response对象是由服务器创建的,我们来使用它们
- request对象是用来获取请求消息,response对象是来设置响应消息
request对象继承结构
- ServletRequest(接口)
- HttpServletRequest(继承ServletRequest)
- org.apache.catalina.connector.RequestFacade 类(tomcat,实现HttpServletRequest接口)
- HttpServletRequest(继承ServletRequest)
request功能
获取请求消息数据
获取请求行数据
GET /zhuixun/demo1?name=zhangsan HTTP/1.1
方法
获取请求方式(GET)
String getMethod()
获取虚拟目录 (/zhuixun)
String getContextPath()获取Servlet路径(/demo1)
String getServletPath()
获取get方式请求参数(name=zhangsan)
String getQueryString()
获取请求URI (代表的范围大于URL)
- 统一资源标识符(/zhuixun/demo1)
String getRequestURI();
获取请求URL
- URL:统一资源定位符(http://localhost/zhuixun/demo1)
- StringBuffer getRequestURL();
获取协议及版本(HTTP/1.1)
String getProtocol()
获取客户机的IP地址
String getRemoteAddr()
获取请求头数据
String getHeader(String name)
通过请求头的名称获取请求头的值
EnumerationgetHeaderNmaes()
获取所有的请求头名称
获取请求体数据
只有POST请求方式,才有请求体,在请求体中封装了POST请求的请求参数
步骤
获取流对象
BufferedReader getReader()
获取字符输入流,只能操作字符数据
ServletInputStream getInputStream()
获取字节输入流,可以操作所有类型数据(上传文件或图片用到)
再从流对象中拿数据
1 | |
其他功能
获取请求参数的通用方式,不论get还是post请求方式都可以使用下列方法来获取请求参数
String getParameter(String name)
根据参数名称获取参数值(username=zs&password=123)
String[] getParameterValues(String name)
根据参数名称获取参数值的数组(hobby=xx&hobby=game)
EnumerationgetParameterNames()
获取所有请求的参数名称
Map<String,String[]> getParameterMap()
获取所有参数的map集合
1 | |
中文乱码额问题
get方式:Tomcat8已经将get方式乱码问题解决了
post方式:会乱码
解决:在获取参数前,设置request的编码
request.setCharacterEncoding(“utf-8”)
请求转发
一种在服务器内部的资源跳转方式
步骤
通过request对象获取请求转发器对象
RequestDispatcher getRequestDispatcher(String path)
使用RequestDispatcher对象来进行转发
forward(ServletRequest request,ServletResponse response)
特点
- 浏览器地址栏路径不发生变化
- 只能转发当前服务器内部资源中
- 转发是一次请求
共享数据
只有在转发的情况下才能通过request域去共享数据。
域对象
一个有作用范围的对象,可以在范围内共享数据
request域
代表一次请求的范围,一般用于请求转发的多个资源中共享数据
方法
void setAttribute(String name,Object obj)
存储数据
Object getAttitude(String name)
通过键获取值
void removeAttribute(String name)
通过键移除键值对
获取ServletContext
ServletContext getServletContext()
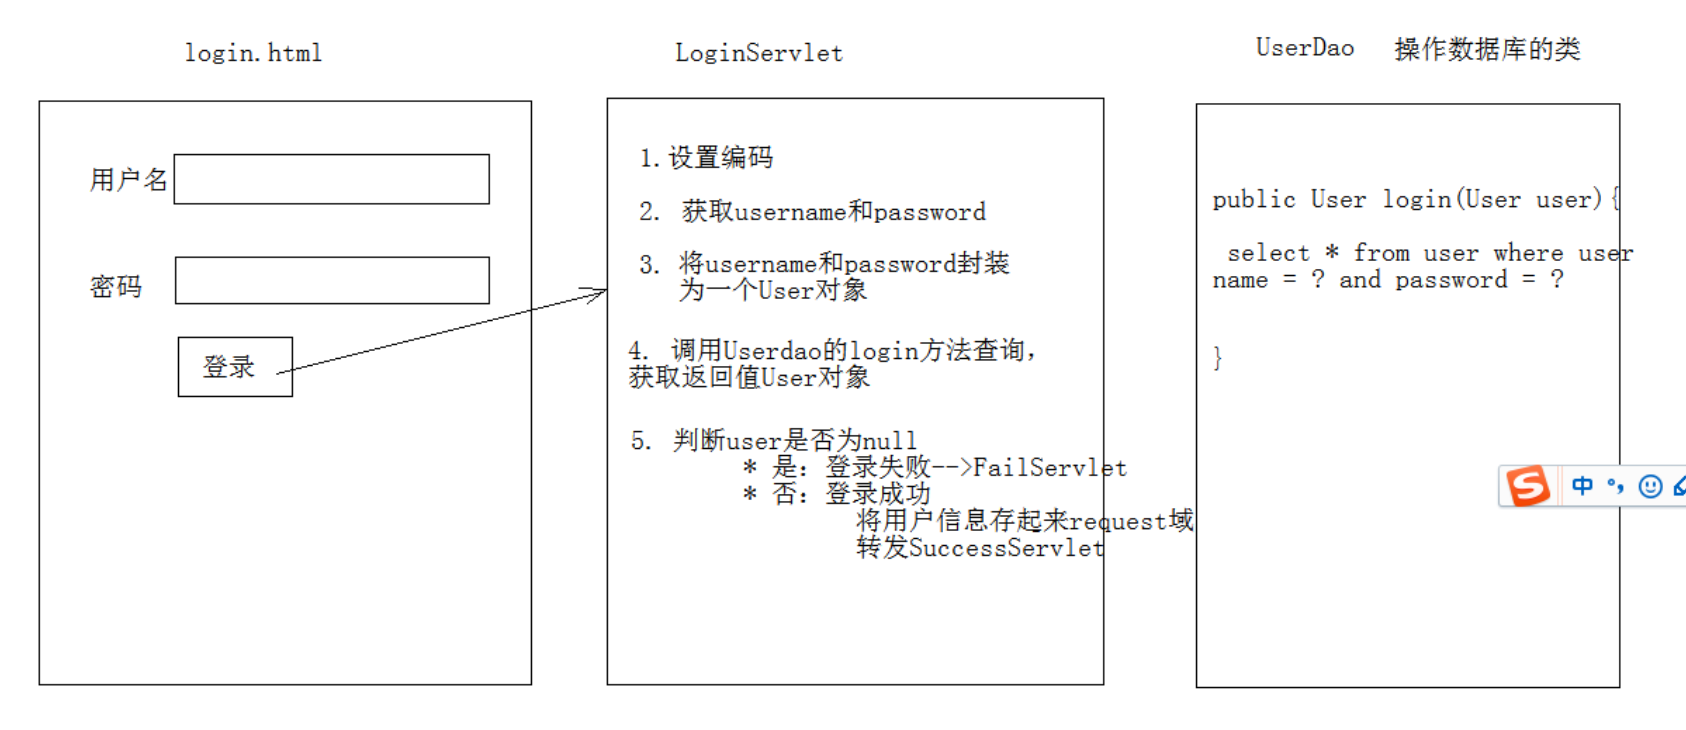
登录案例
- 用户登录案例需求:
- 编写login.html登录页面 username & password 两个输入框
- 使用Druid数据库连接池技术,操作mysql,day14数据库中user表
- 使用JdbcTemplate技术封装JDBC
- 登录成功跳转到SuccessServlet展示:登录成功!用户名,欢迎您
- 登录失败跳转到FailServlet展示:登录失败,用户名或密码错误
开发步骤
创建项目,导入jar包、配置文件
创建数据库、表
创建实体类user
1
2
3
4
5
6
7
8
9
10
11
12
13
14
15
16
17
18
19
20
21
22
23
24
25
26
27
28
29
30
31
32
33
34
35
36
37
38
39
40
41
42
43
44
45
46
47
48
49
50
51
52
53
54package com.zhuixun.domain;
import java.io.Serializable;
/**
* @Title: User
* @Author huan
* @Package com.zhuixun.domain
* @Date 2023/5/15 13:57
* @description:
*/
public class User implements Serializable {
private int id;
private String username;
private String password;
public User() {
}
public User(int id, String username, String password) {
this.id = id;
this.username = username;
this.password = password;
}
public int getId() {
return id;
}
public void setId(int id) {
this.id = id;
}
public String getUsername() {
return username;
}
public void setUsername(String username) {
this.username = username;
}
public String getPassword() {
return password;
}
public void setPassword(String password) {
this.password = password;
}
@Override
public String toString() {
return "User{" + "id=" + id + ", username='" + username + '\'' + ", password='" + password + '\'' + '}';
}
}编写JDBCUtils
1
2
3
4
5
6
7
8
9
10
11
12
13
14
15
16
17
18
19
20
21
22
23
24
25
26
27
28
29
30
31
32
33
34
35
36
37
38
39
40
41
42
43
44
45
46
47
48
49
50
51
52
53
54
55
56
57
58
59
60
61
62
63
64
65
66
67
68
69
70
71
72
73
74
75
76
77
78
79
80
81
82
83
84
85
86
87
88
89
90
91
92
93
94
95
96
97
98
99
100
101
102
103
104
105
106
107
108
109
110
111
112
113
114
115
116package com.zhuixun.utils;
import com.alibaba.druid.pool.DruidDataSourceFactory;
import javax.sql.DataSource;
import java.io.FileReader;
import java.net.URL;
import java.sql.*;
import java.util.Properties;
/**
* @Title: JdbcUtils
* @Author huan
* @Package com.zhuixun.utils
* @Date 2023/5/15 13:54
* @description:
*/
public class JdbcUtils {
private static String url;
private static String user;
private static String password;
private static String driver;
private static DataSource ds;
static {
try {
Properties properties = new Properties();
ClassLoader classLoader = JdbcUtils.class.getClassLoader();
URL resource = classLoader.getResource("com/zhuixun/dataSource.properties");
String path = resource.getPath();
properties.load(new FileReader(path));
//获取数据库连接属性值
url = properties.getProperty("url");
user = properties.getProperty("user");
password = properties.getProperty("password");
driver = properties.getProperty("driver");
//注册驱动
Class.forName(driver);
//2.初始化连接池对象
ds = DruidDataSourceFactory.createDataSource(properties);
} catch (Exception e) {
e.printStackTrace();
}
}
/**
* 获取连接池对象
*
* @return
*/
public static DataSource getDataSource() {
return ds;
}
/**
* 获取连接
*
* @return 连接对象
*/
public static Connection getConnection() throws SQLException {
return DriverManager.getConnection(url, user, password);
}
/**
* 释放资源
*
* @param stmt
* @param conn
*/
public static void close(Statement stmt, Connection conn) {
if (stmt != null) {
try {
stmt.close();
} catch (SQLException e) {
e.printStackTrace();
}
}
if (conn != null) {
try {
conn.close();
} catch (SQLException e) {
e.printStackTrace();
}
}
}
/**
* 释放资源
*
* @param stmt
* @param conn
*/
public static void close(ResultSet rs, Statement stmt, Connection conn) {
if (rs != null) {
try {
rs.close();
} catch (SQLException e) {
e.printStackTrace();
}
}
if (stmt != null) {
try {
stmt.close();
} catch (SQLException e) {
e.printStackTrace();
}
}
if (conn != null) {
try {
conn.close();
} catch (SQLException e) {
e.printStackTrace();
}
}
}
}创建userDao,提供对数据库的操作
1
2
3
4
5
6
7
8
9
10
11
12
13
14
15
16
17
18
19
20
21
22
23
24
25
26
27
28
29
30
31
32
33
34package com.zhuixun.dao;
import com.zhuixun.domain.User;
import com.zhuixun.utils.JdbcUtils;
import org.springframework.dao.DataAccessException;
import org.springframework.jdbc.core.BeanPropertyRowMapper;
import org.springframework.jdbc.core.JdbcTemplate;
import java.util.List;
/**
* @Title: UserDao
* @Author huan
* @Package com.zhuixun.dao
* @Date 2023/5/15 14:33
* @description:
*/
public class UserDao {
private JdbcTemplate jdbcTemplate = new JdbcTemplate(JdbcUtils.getDataSource());
public User login(User loginUser) {
try {
//1.编写sql
String sql = "select * from user where username = ? and password = ?";
//2.调用query方法
User user = jdbcTemplate.queryForObject(sql, new BeanPropertyRowMapper<User>(User.class), loginUser.getUsername(), loginUser.getPassword());
return user;
} catch (DataAccessException e) {
e.printStackTrace();
//记录日志
return null;
}
}
}编写LoginServlet类
1
2
3
4
5
6
7
8
9
10
11
12
13
14
15
16
17
18
19
20
21
22
23
24
25
26
27
28
29
30
31
32
33
34
35
36
37
38
39
40
41
42
43
44
45
46
47
48
49
50
51
52
53package com.zhuixun.servlet;
import com.zhuixun.dao.UserDao;
import com.zhuixun.domain.User;
import javax.servlet.ServletException;
import javax.servlet.annotation.WebServlet;
import javax.servlet.http.HttpServlet;
import javax.servlet.http.HttpServletRequest;
import javax.servlet.http.HttpServletResponse;
import java.io.IOException;
/**
* @Title: LoginServlet
* @Author huan
* @Package com.zhuixun.servlet
* @Date 2023/5/15 13:54
* @description:
*/
@WebServlet("/loginServlet")
public class LoginServlet extends HttpServlet {
@Override
protected void doGet(HttpServletRequest req, HttpServletResponse resp) throws ServletException, IOException {
//1.设置编码
req.setCharacterEncoding("utf-8");
//2.获取请求参数
String username = req.getParameter("username");
String password = req.getParameter("password");
//3.封装user对象
User loginUser = new User();
loginUser.setUsername(username);
loginUser.setPassword(password);
//4.调用UserDao的login方法
UserDao dao = new UserDao();
User user = dao.login(loginUser);
//5.判断user
if (user == null) {
//登录失败
req.getRequestDispatcher("/failServlet").forward(req, resp);
} else {
//登录成功
// 存储数据
req.setAttribute("user", user);
//转发
req.getRequestDispatcher("/successServlet").forward(req, resp);
}
}
@Override
protected void doPost(HttpServletRequest req, HttpServletResponse resp) throws ServletException, IOException {
this.doGet(req, resp);
}
}编写SuccessServlet和FailServlet
1
2
3
4
5
6
7
8
9
10
11
12
13
14
15
16
17
18
19
20
21
22
23
24
25
26
27
28
29
30
31
32
33
34
35
36
37
38
39
40
41
42
43
44
45
46
47
48
49
50
51
52
53
54
55
56package com.zhuixun.servlet;
import com.zhuixun.domain.User;
import javax.servlet.ServletException;
import javax.servlet.annotation.WebServlet;
import javax.servlet.http.HttpServlet;
import javax.servlet.http.HttpServletRequest;
import javax.servlet.http.HttpServletResponse;
import java.io.IOException;
/**
* @Title: SuccessServlet
* @Author huan
* @Package com.zhuixun.servlet
* @Date 2023/5/15 16:06
* @description:
*/
@WebServlet("/successServlet")
public class SuccessServlet extends HttpServlet {
protected void doPost(HttpServletRequest request, HttpServletResponse response) throws ServletException, IOException {
//获取request域中共享的user对象
User user = (User) request.getAttribute("user");
if (user != null) {
//给页面写一句话 设置编码
response.setContentType("text/html;charset=utf-8");
//输出
response.getWriter().write("登录成功!" + user.getUsername() + ",欢迎您");
}
}
}
package com.zhuixun.servlet;
import javax.servlet.ServletException;
import javax.servlet.annotation.WebServlet;
import javax.servlet.http.HttpServlet;
import javax.servlet.http.HttpServletRequest;
import javax.servlet.http.HttpServletResponse;
import java.io.IOException;
@WebServlet("/failServlet")
public class FailServlet extends HttpServlet {
protected void doPost(HttpServletRequest request, HttpServletResponse response) throws ServletException, IOException {
//给页面写一句话 //设置编码
response.setContentType("text/html;charset=utf-8");
//输出
response.getWriter().write("登录失败,用户名或密码错误");
}
protected void doGet(HttpServletRequest request, HttpServletResponse response) throws ServletException, IOException {
this.doPost(request, response);
}
}login.jsp
1
2
3
4
5
6
7
8
9
10
<%@ page contentType="text/html;charset=UTF-8" language="java" %>
<html>
<head><title>$Title$</title></head>
<body>
<form action="/loginServlet" method="post"><input name="username"/>
<input name="password"/>
<button type="submit">提交</button>
</form>
</body>
</html>from表单action路径写法:虚拟目录+Servlet的资源路径BeanUtils工具类,简化数据封装
用于封装JavaBean的(导入commons-beanutils.jar)
- JavaBean:标准的java类
- 类必须被public修饰
- 必须提供空参的构造器
- 成员变量必须使用private修饰
- 提供公共setter和getter方法
方法:
setProperty()
getProperty()
populate(Object obj,Map map)
将map集合的键值对信息,封装到对应的JavaBean对象中。
- JavaBean:标准的java类
Response
功能:设置响应消息
设置响应行
格式(HTTP/1.1 200 ok)
协议/版本 响应状态码 状态码描述
设置状态码
setStatus(int sc)
设置响应头
setHeader(String name, String value)
设置响应体
使用步骤
- 获取输出流
- 字符输出流:PrintWriter getWriter()
- 字节输出流:ServletOutputStream getOutputStream()
- 使用输出流,将数据输出到客户端浏览器
重定向
资源跳转的方式
可以通过、
1 | |
定向的特点(redirect)
- 地址栏发生变化
- 重定向可以访问其他站点(服务器)的资源
重定向是两次请求,不能使用request对象来共享数据
转发的特点(forward)
- 转发地址栏路径不变
- 转发只能访问当前服务器下的资源
转发是一次请求,可以使用request对象来共享数据
服务器输出字符数据到浏览器
步骤:
- 获取字符输出流
- 输出数据
注意:
乱码问题处理方式
1
2
3
4
5
6
7
8
9
10
11
12
13
14//获取流对象之前,设置流的的编码 流的默认编码是ISO-8859-1
response.setCharacterEncoding("utf-8");
//告诉浏览器,服务器发送的消息体数据的编码,建议浏览器使用该编码解码,是在获取流之前设置
response.setHeader("content-type","text/html;charset=utf-8");
//这是一种简单的设置编码的形式,和上面的话是一个意思
response.setContentType("text/html;charset=utf-8");
//获取字符输出流
PrintWriter pw = response.getWriter();
//输出数据
pw.write("你好 response");
服务器输出字节数据到浏览器
步骤:
- 获取字节输出流
- 输出数据
1 | |
验证码
- 本质:图片
- 目的:防止恶意表单注册
1 | |
1 | |
路径写法
路径分类
相对路径
通过相对路径不可以确定唯一资源。
- 如:./index.html
- 不以/开头,以.开头路径
规则:找到当前资源和目标资源之间的相对位置关系
- ./(表示当前目录)
- ../(后退一级目录)
绝对路径
通过绝对路径可以确定唯一资源
- 如:http://localhost/zhuixun/responseDemo可以简写成 /zhuixun.responseDemo
- 以/开头的路径称为绝对路径
规则:判断定义的路径是给谁用的,判断请求将来从哪儿发出
- 给客户端浏览器使用:需要加虚拟目录(项目的访问路径)
- 建议虚拟目录动态获取:request.getContextPath()
- 给服务器使用,不需要加虚拟目录
ServletContext对象
概念
代表整个web应用,可以和程序的容器(服务器)来通信
获取
通过request对象获取
request.getServletContext();
通过HttpServlet获取
this.getServletContext()
功能
获取MIME类型
MIME类型:在互联网通信过程中定义的一种文件数据类型
格式:
大类型/小类型 比如:text/html image/jpeg
获取:
String getMimeType(String file)
域对象(共享数据)
- setAttribute(String name,Object value)
- getAttribute(String name)
- removeAttribute(String name)
ServletContext对象范围:所有用户所用请求的数据
获取文件的服务器路径
1 | |
案例
1 | |
1 | |
1 | |